Showing posts with label tutorial. Show all posts

7.29.2014

pattern weights tutorial.


i have been sewing up a storm this month, which means i have been all over pinterest looking for tutorials and patterns. of course, it is impossible to search for something on pinterest and avoid pinning completely unrelated projects. hence, i discovered the wonderful world of pattern weights. i have been grudgingly pinning my patterns to my fabric for as long as i have been sewing. sometimes i throw caution to the wind and cut without pinning, but this is ill-advised. suddenly, having a set of pattern weights seemed imperative. cue the pinterest search. there are a gazillion pictures of pattern weights, but 93% of them are washers or nuts wrapped in ribbon. totally not my cup of tea. then there are the pyramids. cute, but too bulky for my taste, which leaves us with the flat beanbags. yum. but maybe i am the only one who thinks so, because there is a dearth of inspiration in this department. there is a nice tutorial from positively splendid, but that is about it. i figure i should add my two cents.

materials:
  • fabric - i recommend a thicker fabric. you could either use a heavier weight fabric such as canvas or you can interface a regular fabric. the amount of fabric depends on how many weights you intend on making. this is a good time to use up scraps - no reason all of your weights have to be identical. 
  • filling - you need something that is small, but heavy. i ruled out the traditional rice and beans, because i was not keen on putting food with my fabric stash. i planned to buy BBs, but they were more money than i wanted to spend. looking for a free solution, i pondered beach sand, but i was concerned that it would squeeze out of the seams and make a mess. luckily, the mister remembered the miniature gravel at his school's kayak launching ramp. perfecto!


directions:

step one. decide on a shape and size for your pattern weights. i made my weights triangular, because i think they will work better if i am trying to cut out smaller pieces and/or need to put a weight near a corner that is less than ninety degrees. not to mention, triangles are awesome. my triangle pattern.

step two. decide how many pattern weights you want and cut two triangles for each weight. most folks seem to make sets of six or eight. i made nineteen. yep, nineteen. i wanted a lot, because sometimes you need to lay out all of your pattern pieces simultaneously and six weights will not cut it.

step three. put two triangles right sides together. sew around with a 1/4" seam allowance leaving a 1" gap at the bottom. snip the threads and clip the seam allowance around the corners. turn the triangle right side out through the little gap.


step four. use a boning tool or chopstick to push out the corners. then repeat step three for all of your triangles. 


step five. realize that the process of snipping threads and clipping corners is going to make a mess, so pause pattern weight production to create a cute thread catcher. feel free to use your prototype or unfinished pattern weights to hold down the pattern for the thread catcher. adorable fabric bucket tutorial.


step six. fill each of the triangles through the little gap at the bottom. leave some room to breathe in each of the triangles. i left about 1/4" empty along the bottom of each triangle. this leaves the weight malleable enough to pick up easily. pin the gap closed and add it to the stack of ready-to-be-finished weights.


step seven. the finish. all that is left is to close the gap at the bottom of your triangles. you can use your machine to top stitch along the bottom or even top stitch around the entire triangle. i top stitched the bottom of my prototype, but i did not like the appearance. instead, i went against every fiber of my being and opted for hand-sewing the gap with a blind stitch. this was an unusual step for me, because anytime a pattern requires hand-stitching, i always (and i mean ALWAYS) ignore it and machine stitch. but these little gems just look so perfect when they are hand-sewed, it was totally worth the trouble (nope, i did not take the requisite picture of myself hand sewing. you will have to use your imagination). if you do not know how to do this type of hand-sewing, check out this tutorial. it is easy.
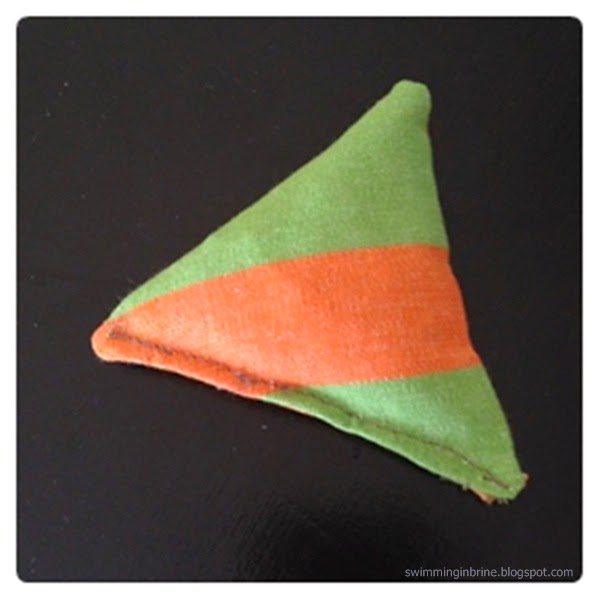
top-stitched triangle. no, thank you.

step eight. find or create some sort of receptacle to hold your new darlings. enjoy your pattern weights!


7.13.2013

embroidered quilt label tutorial.

i believe every quilt should have a label. why? because, by nature, quilts are family treasures that are passed down through the generations. one hundred years from now, the owner of your quilt will be wondering about its history. some folks think there are different ways to make a quilt label, but in my world, there is only one right way. hand embroidered.

when i made my first quilt, i searched the internet for some clues on how to make a quilt label, but i did not find any information on creating embroidered labels. hence, a few years later, here is my step-by-step guide to making a hand-embroidered quilt label. note: the pictures for this tutorial were taken when i was making a label for a newborn baby's good wishes quilt -  all names have been obscured to protect the innocent.

materials:
  • piece of fabric about 12"x12": you can use fabric from the quilt or a solid color. i like to use unbleached cotton muslin
  • piece of fusible interfacing that is 1/4" wider and longer than your desired label: if you are planning a 4"x4" label, you need a piece of interfacing that is 4.25"x4.25"
  • iron
  • label plan: see step 1.
  • disappearing ink pen - you can use the washable ink, fine point markers available in sewing stores, or you can use the pilot frixion erasable gel pen (fair warning-this one is not made for fabric, but i love it)
  • hand-sewing needle
  • embroidery floss/thread
  • embroidery hoop
  • scissors
  • a little piece of cardboard (i used the cardboard from a cheerios box)


step 1. plan your label. on paper. you can hand write it, but i am a perfectionist, so i create my plan on the computer and print it out. if you choose this method, be sure to use a simple, easy-to-read, sans serif font. i like to use handwriting fonts. if you want to add any designs, like chickens with ears, you should include them on your label plan. borders are optional. you can include any information you want, but at the very least, you should put your name and the date you made the quilt. you can also give your quilt a name, or if it is a gift, you can include the name of the recipient and the occasion. the sample below is my standard format for newborn baby quilts.

step 1. iron the fusible interfacing onto the back of the fabric. it should be in the center of the fabric.


step 2. tape your label plan on your light table. my light table is my sliding glass door. fancy, eh? please ignore the mess that is outside.


step 3. tape your fabric over the label plan, interfacing side down. make sure your label is centered directly under the interfacing.


step 4. use your disappearing ink pen to carefully trace all letters and designs. if you have straight lines to trace, use a ruler. seriously. you can thank me later.

trace the letters and designs.

use a ruler to trace any straight lines.

step 5. put your fabric into an embroidery hoop. make sure the fabric is tight.


step 6. cut a length of embroidery thread. you want to cut it long enough that you do not have to constantly take new thread, but not so long that it is constantly tripping all over itself. i typically cut about 36". now that you have your chunk of thread, check it out. notice it has 6 strands? great. separate it so you have three sets of 2 strands. find your little chunk of cardboard and cut a little (1/4") slit on each side. wrap two of the 2-strand chunks around the cardboard, securing the ends in the little slits. pick a needle with which you want to sew (make sure the eye is large enough to fit your thread, but not much larger) and thread it with the third strand.

6 strands.

2 strands.

1 chunk on the needle and 2 chunks waiting on the cardboard.

step 7. use a basic back stitch (instructions here) to carefully stitch the letters, designs, and border. use as few stitches as necessary to make each letter. now, i am not saying to be frugal, but also, do not use thirty-seven stitches to make one letter. if your fabric starts to get slack, stretch it over the hoop again. when you stretch the fabric over the hoop, it could make your straight lines look wonky. make sure your stitches follow the line, no matter how wonky. trust me. when you take it out of the hoop, the fabric will no longer be stretched and everything will once again look straight.

the requisite mid-sew picture.

wiggly lines, because the fabric is stretched in the hoop.

finished!

step 8. trim the fabric, leaving about 1/2" around the label. fold the edges to the back and iron. (my apologies, i forgot to take a picture of that step.) finally, sew the label onto the quilt. i attach the label to the back of my quilt, after my quilt is completed. you can also attach it before you make your quilt sandwich; however, if you do this, keep in mind that your quilting stitches will go across the label. i like to use my machine to top stitch around the the edge of the label. yes, the stitches show through on the other side of the quilt. if you do not want the stitches to show through, then you either need to attach the label before making the quilt sandwich, or you can hand stitch it onto the back of the quilt making sure your stitches only go through the first layer of the quilt. congratulations, you have a beautiful handmade quilt label!

the label attached to the back of the quilt. notice all the lines that were wiggly in the hoop are now straight.

the quilt folded up and tied with a ribbon. i like to fold it, so that i can fold back the edge to display the label.

9.03.2011

baby pants tutorial.

i think babies wearing pants are adorable. i mean, i think all babies are adorable, but when you put them in pants, you up the ante. naturally, i wanted to put pants on my little guy, but i balked at the craziness of buying miniature pants that will only fit for a few months. i figured i could sew some, but my internet search did not yield exactly what i was looking for, so i created my own pattern. i am posting it here with a tutorial, in the hopes of saving you the trouble of creating your own pattern. i appreciate you using this pattern for personal use only.


this pattern is for basic elastic-waist baby pants. they are not the "super easy" single pattern piece pants, rather proper pants that have two pattern pieces. a front with a dropped waist for a better fit and a back with extra space to fit a diapered bum. the pattern is sized for 3-6 months, but it can be easily re-sized to fit your baby (see below for a little information about changing the sizes). if you have a serger, i recommend using it for steps 2, 3, and 4.

materials: 1/2 yard of lightweight fabric and 17 inches of 1/2" elastic. [choosing fabric: cotton or cotton flannel are both good. knits stretch, so sewing is more difficult. horizontal stripes need to be matched during cutting and sewing, which makes them a pain in the neck, but not impossible.]
 
directions: (click on images to see them larger)

before you start, print out the baby pants pattern. in the print box, under "page scaling", select "none." it should print in landscape mode on 4 pieces of paper. put the papers next to each other without overlapping the edges. make sure to match up the lines - there might be a slight gap where the printer created margins, but that is okay. tape the pages together and cut them out.

put the pages next to each other without overlapping papers. there might be a slight gap due to printer margins.

step one. fold your fabric right sides together and lay your pattern pieces on top. the bottom edge of each pattern piece should be parallel to the grain of the fabric. pin the pattern pieces in place and cut out your fabric.

step 1. cutting fabric.

step two. take the pattern pieces off the fabric. your fabric should already be right sides together. pin along the center seams. sew. press the seams (serger: press to one side. regular machine: press open).

step 2. pin and sew front and back center seams.

step three. make sure your fabric is right sides together. you do not want extra fabric at the top or bottom edges, so in this step pinning is important!! pin the top and bottom corners of one side. then match up the rest of the side and pin. repeat this for the other side. sew down both sides. press.

step 3. pin the top and bottom side corners. then pin the rest of the side.

step four. lay the pants down flat, making sure the sides are actually on the side. this might sound stupid, but unfinished pants can be a tad deceiving, so just check! the side seams should be on the sides, and the center of the waist should dip down in the front. again, you do not want extra fabric at the bottom edges, so pinning is important. line up the seams in the center of the crotch and pin. pin the two bottom corners. now pin the rest of the inseam. sew. press.

step 4. match and pin center seams and bottom corners of inseam. pin the rest of inseam and sew.

step five. create the casing for the elastic. turn the pants inside out. turn the top edge down 1/4" and press. now turn it down 3/4" and press. have a seam gauge stashed in your sewing box? pull it out and use it...you will see, it will make this step easier. pin the edge, with the top of the pins at the top of the pants. this is probably the opposite of how your brain wants to pin this edge, but when you get to the sewing machine you will thank me, because you will be able to take out the pins while sewing. if you have a label, sew it on before you sew the edge. if you have a tag that goes in a seam, you can tuck it under the edge before sewing. sew along the edge all the way around the waist, but stop 1" before you get to your starting point. this will leave a gap that you will use to thread the elastic into the casing.

step 5. elastic casing at waist. fold & press 1/4". fold & press 3/4". add label. pin elastic casing.

step 5. sew the bottom edge of elastic casing.

step six. thread your elastic through the casing. make sure the elastic is flat inside the casing (you do not want to find a twist after closing the casing) and overlap the edges of the elastic by about 1". sew  the two ends of the elastic with a zig-zag stitch. now finish sewing the casing by closing the 1" gap you left when sewing the edge in step five.

step 6. thread elastic through casing. overlap elastic ends by 1". join elastic ends with zig-zag stitch. finish sewing the elastic casing.

step seven. hemming the pants. turn the pants inside out. fold the hem up 1/4" and press. then fold it up 3/4" and press. again, ignore your brain and place the pins, so that the top of the pin is sticking out the bottom of the pants leg. now turn the pants right side out and sew along the edge. if you like, you can do a second line of stitching for decoration. repeat on the second leg.

step 7. hem. fold & press 1/4". fold & press 3/4". pin. sew hem.

step 7. optional: sew a second hemline. nibble baby toes.

congratulations, you have finished your pants!!!

finished pants! big enough to fit a diapered bottom.

a delightful modification is to add a different fabric at the bottom of the legs. if you want to do this, you need to replace the bottom of each leg with a different fabric. do this BEFORE you start assembling the pants. remember that 1" of the bottom is turned under during step seven, so if you want a 1" strip of a different fabric at the bottom, you actually need to cut a 2 1/4" strip (1/4" seam allowance to attach to the leg, 1" turned under when hemming, and 1" visible). you also need to cut 3/4" off the bottom of the pant leg and then attach your colored piece to the bottom of each leg. the sew the pants as usual.

pringle modeling pants with a different-colored bottom edge.

altering the pattern to fit your baby. if the the pants are too short/long, just extend/shorten the bottom portion of the legs. if the pants do not rise high enough to reach the waist or go up to your baby's chin, extend/shorten the waist portion of the pattern piece. if the pants are not wide enough or too wide, extend/shrink the side of each pattern piece (note, if you are adjusting the width, you probably need to adjust the length of your elastic).

need help?? if you need assistance or if something does not make sense, post a comment or send me an email at pickelswimming@gmail.com

credits: when creating this pattern, i consulted the following sites: wabi sabi baby, made, make baby stuff, and sew mama sew.

3.12.2011

easy peasy burp cloths tutorial.


i do not want my little pringle to suffer the fate of the cobbler's children, so i am getting a head start on sewing for my baby. the other day as i wandered through the fabric store, i came across some lovely flannel on super sale. i decided to buy some to make some burp cloths. i chose four different fabrics and bought a half yard of each. not sure about the general sizing of burp cloths, i turned to the internet. i quickly discovered that "basic burp cloth patterns" are overly complicated, because they are always in the shape of a peanut. now i have not ever raised a child, so maybe i am missing something, but for the life of me, i cannot figure out why a rectangular-shaped burp cloth is undesirable. i have a feeling that all of you moms out there are snickering and thinking, "ha! she will learn soon enough that the only way to properly handle spit-up is with a peanut-shaped cloth," but just in case there are other folks out there like me, i have created this tutorial for the world's easiest rectangular burp cloths. if you can sew a straight line, you can make these.

materials (for five burp cloths about 8" x 18"): 1/2 yard of each of two different complimentary flannels and thread.

step 1. cut your fabric into 8" strips (don't worry about cutting the length - it is already 18"). you should have ten of these strips - five in each color. cutting perfection is not of the essence, because we will clean it up in step 3. 

cut 2 pieces of flannel about 8" x 18"

step 2. put one strip of each fabric right sides together. i did not use pins, but if you are a uncomfortable sewing without pins, then now would be your moment of pinning. when you are ready to sew, start in the middle of one end and sew around the edges with a 1/4" seam allowance. leave a 2" opening to turn the cloth right-side out.

step 3. clean up the edges and cut off the corners, making sure you do not cut through any stitches.

cleaning up the seam allowance and cutting off the corners.

step 4. use the gap to turn the cloths right side out. if you have a bone tool, now would be the time to put it to use. if you do not have one, use a chopstick or some other small pointy-ish thing to push out the corners.

a bone tool.
the cloth turned right-side out.

step 5. iron the cloth flat, making sure the seams are pulled out as far as possible. tuck under the edges of the gap and iron flat.

step 6. sew around the edges with a tiny seam allowance (i did about 1/8"). this will close the gap and make the cloths look pretty.

sewing along the edges will close the gap. the closer the better.

and that is it!! you are done. enjoy your stack of easy peasy burp cloths.

two of my finished burp cloths.

1.08.2011

wonky stripes quilt pattern.

hello quilters. if you are interested in a quilt that does not require gads of painstaking measuring, cutting, and piecing, this is the quilt for you. this design works well with both planned fabrics and scraps.


how much fabric should you buy? great question, but it depends on how big you want to make your quilt. at the end, i will show you how to calculate your fabric needs if you want to do a different sized quilt. the materials list is for a quilt that has 7.5" squares and a final size about 60" x 60".

materials:
  • 1/3 yard of each of 9 fabrics for the quilt design
  • 2 yards of fabric for the quilt top border
  • 3 2/3 yards of fabric for the back
  • 1/3 yard of binding fabric
  • 64" x 64" square of batting
  • 1 spool of quilting thread

quilt top:
take each of your 9 fabrics and cut along the long side of each to make 5 or 6 wonky strips (i.e. smaller at one end). to ensure that your strips are appropriately wonky, i recommend using scissors instead of a rotary cutter. you can also do wavy lines, but these are more complex to sew. see my tutorial on sewing wavy lines.

cut wonky strips.

mix up all of the long strips. create strip sets with different fabrics. sew strips together with a 1/4" seam allowance.  make sure the strip set is at least 8" wide. press the seams open, using starch as you iron. starch is your friend!!! it not only helps to create flat seams, it also acts as sizing, so that the fabric will hold its shape when you start cutting.

mix together fabrics and sew together strip sets.

cut each strip set into five 8" squares. you should end up with 45 squares. using the clear plastic quilting rulers and a rotary cutter is the easiest way to complete this task. if you do not possess these items, then find yourself some joann's coupons and go shopping. seriously. it is possible to cut these squares without these tools, but why on earth would you want to make your life extra difficult?

cut out squares. finished square.

set aside 9 squares for the quilt back. lay 36 of the squares on a large, flat surface (i use the floor), and move them around until you are satisfied with the arrangement. for this design you should use a checkerboard-style pattern with vertical-lined squares next to horizontal-lined squares (see picture - orange squares represent vertical-lined and green squares represent horizontal-lined). sew the squares together with a 1/4" seam allowance. press the seams open. again, be generous with the starch.

arranging vertical and horizontal stripes in a checkerboard pattern.
arranging the squares of a large quilt that was made with this pattern.

lay out your border fabric. you will need to cut four 7" strips the length of the fabric (i.e. 7" x 72" strips). attach your borders either with mitered corners or butted edges...your choice. trim any excess fabric.

now for the quilt back. sew together the remaining 9 pattern squares. press the seams open (don't forget the starch!). lay out your backing fabric. cut out two pieces. 16" x 64" and 40" x 64". sew the strip of squares to the long edge of one piece of backing fabric. then attach the other piece of backing fabric to the other side of the strip of squares. press the seams open.

cutting the backing pieces.
the assembled quilt back.

since this post is focused on the quilt pattern, not on teaching you how to make a quilt, i have included links to helpful tutorials for the final steps of quilt creation.
  1. make your quilt sandwich.
  2. quilt your quilt. unless you are a die-hard traditionalist, i assume you will be using a machine to do the quilting. you can do free-motion quilting (more free-motion quilting) or straight-line quilting (which also includes stitch-in-the-ditch quilting). trim the excess fabric from the edges.
  3. attach binding (more binding and more binding).
  4. create a quilt label (i do hand-embroidered labels, but that is a tutorial for another day). and sew it onto the back of the quilt.

voila!! you have a lovely wonky stripes quilt.
a larger version of the same quilt pattern.


calculating fabric for alternate quilt sizes.
the measurements in this example are the ones i used to calculate how much fabric was needed for the 60" x 60" square quilt.

quilt top design:
most fabric is 42-44" wide, but that includes selvages, so we will assume you have a usable section at least 41" wide. we want an 8" square, which means that we need 8" + seam allowances. since we will be cutting our fabric into strips, we should add in a few inches for seam allowances. to be safe, i would purchase 12" of fabric (1/3 of a yard), which will yield 5 squares. each additional 12" piece of fabric will result in another 5 squares. our quilt calls for 44 squares, so we will need 9 different fabrics (9 fabrics x 5 squares per fabric = 45 squares, which is 1 more than we need).

determining fabric requirements for quilt top pattern.

quilt top border:
this design includes a 6" border. the quilt top is to be 60" wide, so you need to buy at least 64" of fabric (this includes extra for seam allowances). buy 2 yards of border fabric.

quilt back:
this design uses 8 squares from the quilt top sewn together to form a strip down one side of the back. the rest of the backing fabric can be whatever your heart desires, just remember that the quilt back needs to be a couple of inches larger on all sides. for this size quilt, you will need 128" (3 2/3 yards) of fabric. you will have excess, but there is no way to avoid this (unless you want to piece together your backing, in which case you can create your 64" square any way that works for you).

quilt innards:
you need quilt batting that is at least a 64" square. you can buy whatever batting you prefer - personally i prefer low loft cotton batting. my standard is warm & natural, but when it is available my favorite is a 50% cotton, 50% bamboo batting.

quilt binding: 
you will need to cut 2.5" strips and sew them together until you have enough binding to go around all four sides of the quilt. the binding will be 60" x 4 = 120", plus a little extra, so you need at least 130" of binding. your strips will be 41" long (the width of your fabric), so you just need to know how many to sew together to get the desired length. 4 strips will be about 164" long. perfect. 4 strips x 2.5" wide = 10" of fabric. to be safe, you should buy at least 12" of binding fabric.
determining fabric requirements for quilt binding.