11.25.2011

art shmart.

hard to leave this little face at home.

three weeks ago marked the end of my maternity leave. (obviously it also marked the end of my free time, hence the abrupt end to blog posts.) it was a bummer because as a happy homebody, i do not suffer from a burning desire to be employed. alas, there are bills to pay, so back to the grindstone. but the exciting part about returning to work is that at the beginning of the year my principal did some finagling and managed to hold open the art position just long enough for me to get my art certification. and now, that's right, i am an art teacher. and it is divine. i teach art to all the students in the second through fifth grades. it is official. i love my job. 

two fourth grade classes at one time. crazy, but we survive.

now i am not one for complaining. well actually, that's a lie. i complain a lot. however, at work i try to keep my chin up, because i have learned that the place is what you make of it. i wander the halls with a big smile, because my personal motto is "a happy face makes a happy place." are you gagging? sorry. now where was i? oh right, about to tell you about the trash pile i inherited that is supposed to pass for an art classroom. yikes.

six 1" squares of fabric clipped together and stored in a box. what the what? why save these?

floppy discs from 1993. how did we manage with 2mb of storage?

okay, so i am thrilled to have a classroom - not all art teachers are so lucky - but this place was a dump. bursting at every seam with bits of paper, jumbled up crayons, oozing tubes of ink, lumpy paint, broken pencils, and dust. oh my god, so much dust.

politically correct crayons. i heart crayola.

the good news is that under the craziness, i unearthed a surprisingly good selection of art supplies. three weeks of tossing, scrubbing, sorting, cleaning, and organizing, and i can finally see the light at the end of the tunnel. i still have six boxes of paper scraps to sort by size and two hundred large art reproductions to organize, but then i will have a dream classroom.

making adinkra "cloth" with a third grade class.

and my days will consist of wrangling children to create gloriousness, wandering the internet for project inspiration, and creating sample projects. did i say, i love my job? i do. i love my job.

10.27.2011

wonky windows #20.

looking at the world through my eyes.

yesterday, i went a-hunting for some toys for pringle. i did find some goodies at target, but i have to admit, some of the prices seem ridiculous, especially for toys the kid will discard after a few months. so thinking i might be able to find something in good condition and easy to disinfect (hello BLEACH!), i wandered over to the local goodwill store, where i found a couple great toys. yay. and then i saw these shoes. and if this one isn't bad enough, just know that there is an entire display. it is a ten-foot-square, waist high stack of boxes filled with this ridiculous footwear. i am eagerly anticipating the day when i see someone trying to walk down the street in these. as i am typing this, i am terribly bummed to realize i did not look at the price. clearly i was too mesmerized. unfortunately that means i cannot finish the sentence..."these can be yours for the bargain price of __________ dollars."

sometimes i try to act like an adult. here and there i think i manage to fool a few people, but not in the grocery store. i am like a five year old. who needs lunch when you can have a box of animal cookies?

10.21.2011

wonky windows #19.

 this week in our wonky world.


on monday we found this sign hanging in our building. now, the mister and i are no strangers to living life without running water, but no water at all? for five hours? with a baby? oh dear. i decided to fill the bathtub, so there would be water for washing hands and bucket baths. yes, a bath in a bucket. the mister filled up a giant soup pot. when i was filling up a pitcher and some water bottles, the mister suggested that i was going a bit overboard, because we would not need that much water.


and then i woke up in the morning and found this...every thing that would stand still long enough to hold water was full. when i asked the mister what it was for, he said it was just in case we needed some more water. apparently, he had changed his tune. 

despite our preparation, i still managed to end up in the shower with no water. see, i went to the gym and when i returned, i planned to use pringle's bathtub to take a bucket bath. but then the mister pointed out that the water had not yet been shut off, so i could take a shower. my gut told me it was a bad idea, but i did it anyways. that's right. i drained the bathtub and got in the shower. of course you know where this is going...i got halfway through my shower and whoops, the water stopped. so there i was, dripping wet, with conditioner in my hair, and no water. thank goodness for the mister's arbitrary desire to fill every container in the kitchen. i raided the mister's stash of water, dumped it in a bucket and finished my bath. thankfully, the rest of the water shutoff was a total non-event.

10.08.2011

grease be gone.

i do not often do product reviews, but i simply HAD to tell you about my fancy new shampoo. i know, random, but seriously, this stuff is too cool for school.

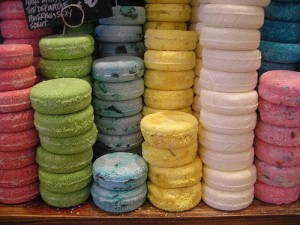
stacks of solid shampoo by LUSH.

you see, last year when my pregnancy was headed into the second trimester, my head turned into a grease factory. so much for that "healthy hair" everyone had promised. it was awful, but i found a new shampoo and conditioner and figured it would all wash away (literally) after the baby was born. so problem solved.

and then i gave birth to pringle. thanks to some wild post-pregnancy hormones everything was once again out of whack. argh! at first i did not notice, because i was too busy oohing and aahing about my baby. but six weeks after pringle's grand entrance, i emerged from my cloud of euphoria long enough to chop off my locks. oh dear. now there was nowhere for the goo to hide. so at the moment when you feel like a lumpy sack of potatoes and your only saving grace is your hair...i was stuck with a greasy do. depressing to say the least. i tried skipping the conditioner. no dice. i scoured the shelves at target and tried out five different shampoos, but apparently the oil factory had amped up production, because nothing was working.
solid shampoo by LUSH.

i attempted to find some information on the internet, but the searching yielded few results. apparently oily hair is a taboo topic. why? i do not know. so i am taking the topic out of hiding and putting it in the spotlight. during my googling, the only useful thing i found was this list of the top 10 shampoos for oily hair. i have always been a drugstore shampoo kinda girl, so i balked at the idea of spending $30 or more for a bottle of shampoo based solely on some random online review. and i was even less convinced that i should buy a bar of shampoo. yes, a BAR of shampoo. 

jumping juniper shampoo by LUSH.

but i had reached a point of desperation, so pringle and i headed to the mall and went to LUSH to pick up a bar of their jumping juniper shampoo. ummm..can we say wow? i was totally skeptical that bar soap for my noggin would work, but the reviews were nothing short of glowing. and now i have to add my two cents...this shampoo is beyond fabulous. 1) my hair is 100% not greasy. yay. 2) it lathers better than any shampoo i have ever had. 3) it only costs ten dollars 4) it seems to last forever. 5) it is not liquid, so the transportation security administration does not care how much shampoo i have in my carry-on. 6) it will not spill in my luggage or gym bag. 7) it is a BAR of shampoo people!


jungle conditioner by LUSH.

so for everyone out there with oily hair or any other hair issues or non-issues...seriously, you should check out LUSH's solid shampoos. there are 15 varieties designed to combat every possible hair problem. i like my little puck so much that i am heading to LUSH to buy their solid conditioner. yay for shiny, happy hair!!

this product has earned the pickel stamp of approval.

note 1: i was not given any compensation to write this review.
note 2: all photos of LUSH products are courtesy of the internets.

9.20.2011

sew vintage.

last week pringle and i went to los angeles to visit my family. we stayed at my parent's house, which is a treasure trove of, well, just about anything you can imagine and more. i never fail to discover things to amuse me....this time around i found an old sewing book. totally fascinating. if it was not already obvious, i am a total sewing nerd. just reading about sewing makes me happy, but pictures and patterns?? in a book older than me?? yummy!!


everything you ever wanted to know about little girls' dresses. this was the "children's" section. all it had was dresses, dresses, and more dresses. and a picture of a boy in pants. there was a measuring tape next to his leg, but the text had zero explanation about pants. it should have been the "girl's" section. oh well.


plackets? sounds like a military formation. it's not. it is the slit you put in the hem of a skirt or dress. you learned something new, right?


interesting choice of adjectives. personally, i think i might have called these "pretty" dress trims.


do girls still prance? because these girls are definitely prancing.


oh the joys of smocking!!! i love me some smocking. if i had this many smocked dresses, i too would be holding hands and dancing in circles.


bathing suits. love it. so old-fashioned. so amazing.

so adorbs!! time to cook up a sister for pringle. just kidding.

9.03.2011

baby pants tutorial.

i think babies wearing pants are adorable. i mean, i think all babies are adorable, but when you put them in pants, you up the ante. naturally, i wanted to put pants on my little guy, but i balked at the craziness of buying miniature pants that will only fit for a few months. i figured i could sew some, but my internet search did not yield exactly what i was looking for, so i created my own pattern. i am posting it here with a tutorial, in the hopes of saving you the trouble of creating your own pattern. i appreciate you using this pattern for personal use only.


this pattern is for basic elastic-waist baby pants. they are not the "super easy" single pattern piece pants, rather proper pants that have two pattern pieces. a front with a dropped waist for a better fit and a back with extra space to fit a diapered bum. the pattern is sized for 3-6 months, but it can be easily re-sized to fit your baby (see below for a little information about changing the sizes). if you have a serger, i recommend using it for steps 2, 3, and 4.

materials: 1/2 yard of lightweight fabric and 17 inches of 1/2" elastic. [choosing fabric: cotton or cotton flannel are both good. knits stretch, so sewing is more difficult. horizontal stripes need to be matched during cutting and sewing, which makes them a pain in the neck, but not impossible.]
 
directions: (click on images to see them larger)

before you start, print out the baby pants pattern. in the print box, under "page scaling", select "none." it should print in landscape mode on 4 pieces of paper. put the papers next to each other without overlapping the edges. make sure to match up the lines - there might be a slight gap where the printer created margins, but that is okay. tape the pages together and cut them out.
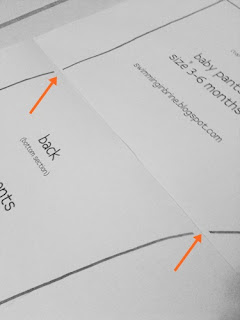
put the pages next to each other without overlapping papers. there might be a slight gap due to printer margins.

step one. fold your fabric right sides together and lay your pattern pieces on top. the bottom edge of each pattern piece should be parallel to the grain of the fabric. pin the pattern pieces in place and cut out your fabric.

step 1. cutting fabric.

step two. take the pattern pieces off the fabric. your fabric should already be right sides together. pin along the center seams. sew. press the seams (serger: press to one side. regular machine: press open).

step 2. pin and sew front and back center seams.

step three. make sure your fabric is right sides together. you do not want extra fabric at the top or bottom edges, so in this step pinning is important!! pin the top and bottom corners of one side. then match up the rest of the side and pin. repeat this for the other side. sew down both sides. press.

step 3. pin the top and bottom side corners. then pin the rest of the side.

step four. lay the pants down flat, making sure the sides are actually on the side. this might sound stupid, but unfinished pants can be a tad deceiving, so just check! the side seams should be on the sides, and the center of the waist should dip down in the front. again, you do not want extra fabric at the bottom edges, so pinning is important. line up the seams in the center of the crotch and pin. pin the two bottom corners. now pin the rest of the inseam. sew. press.

step 4. match and pin center seams and bottom corners of inseam. pin the rest of inseam and sew.

step five. create the casing for the elastic. turn the pants inside out. turn the top edge down 1/4" and press. now turn it down 3/4" and press. have a seam gauge stashed in your sewing box? pull it out and use it...you will see, it will make this step easier. pin the edge, with the top of the pins at the top of the pants. this is probably the opposite of how your brain wants to pin this edge, but when you get to the sewing machine you will thank me, because you will be able to take out the pins while sewing. if you have a label, sew it on before you sew the edge. if you have a tag that goes in a seam, you can tuck it under the edge before sewing. sew along the edge all the way around the waist, but stop 1" before you get to your starting point. this will leave a gap that you will use to thread the elastic into the casing.

step 5. elastic casing at waist. fold & press 1/4". fold & press 3/4". add label. pin elastic casing.

step 5. sew the bottom edge of elastic casing.

step six. thread your elastic through the casing. make sure the elastic is flat inside the casing (you do not want to find a twist after closing the casing) and overlap the edges of the elastic by about 1". sew  the two ends of the elastic with a zig-zag stitch. now finish sewing the casing by closing the 1" gap you left when sewing the edge in step five.
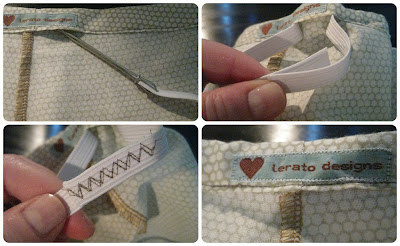
step 6. thread elastic through casing. overlap elastic ends by 1". join elastic ends with zig-zag stitch. finish sewing the elastic casing.

step seven. hemming the pants. turn the pants inside out. fold the hem up 1/4" and press. then fold it up 3/4" and press. again, ignore your brain and place the pins, so that the top of the pin is sticking out the bottom of the pants leg. now turn the pants right side out and sew along the edge. if you like, you can do a second line of stitching for decoration. repeat on the second leg.

step 7. hem. fold & press 1/4". fold & press 3/4". pin. sew hem.

step 7. optional: sew a second hemline. nibble baby toes.

congratulations, you have finished your pants!!!

finished pants! big enough to fit a diapered bottom.

a delightful modification is to add a different fabric at the bottom of the legs. if you want to do this, you need to replace the bottom of each leg with a different fabric. do this BEFORE you start assembling the pants. remember that 1" of the bottom is turned under during step seven, so if you want a 1" strip of a different fabric at the bottom, you actually need to cut a 2 1/4" strip (1/4" seam allowance to attach to the leg, 1" turned under when hemming, and 1" visible). you also need to cut 3/4" off the bottom of the pant leg and then attach your colored piece to the bottom of each leg. the sew the pants as usual.

pringle modeling pants with a different-colored bottom edge.

altering the pattern to fit your baby. if the the pants are too short/long, just extend/shorten the bottom portion of the legs. if the pants do not rise high enough to reach the waist or go up to your baby's chin, extend/shorten the waist portion of the pattern piece. if the pants are not wide enough or too wide, extend/shrink the side of each pattern piece (note, if you are adjusting the width, you probably need to adjust the length of your elastic).

need help?? if you need assistance or if something does not make sense, post a comment or send me an email at pickelswimming@gmail.com

credits: when creating this pattern, i consulted the following sites: wabi sabi baby, made, make baby stuff, and sew mama sew.

8.30.2011

you have no pants.


the folks in lesotho do not have large quantities of clothes stashed away in their closets. actually, they don't have closets, they have free-standing wardrobes, but that is a horse of a different color. the point is they do not have a lot of clothes. but they have clothes. they do not run around wearing leaves and leather thongs. in fact, they dress a lot like us....well, sort of. what i mean to say is that just like us, they wear skirts, pants, shorts, t-shirts, dresses, jackets, etc. 


even the babies and children have clothes. sometimes it seems like babies have the most clothes, because it is handed down from kid-to-kid. they grow out of it before it wears out, so it accumulates. which makes it all the more entertaining that small children can often be found sans pants. especially in the summer. maybe it is because their mothers are tired of washing diapers or just because the kids are tired of pants. i do not know. but one of my fellow peace corps volunteers started telling kids "you have no pants." this line never ceased to make us laugh hysterically. [side note: in the light of day on my couch in the U.S.A., i struggle to convey the hilarity, but peace corps volunteers will laugh at almost anything...i guess it is a mechanism of self-preservation that prevents you from spending all of your time crying.]

pringle's first-ever fitting.

since it still makes me giggle, i like to say it to pringle. all the time. he wears onesies EVERY day, with no pants. we save his two pairs of pants for outings. although i do love to tell him that he has no pants, i think they look adorable on him and i wish he had more. but it seems insane to pay money for unnecessary clothes he will grow out of in a month. so i googled pants patterns. how hard can they be, right? oh my. not only are they not hard, they are ridiculously EASY. (check out my tutorial.)

first pattern. needs work.

i found a two-piece pattern that is sized for infants, but the pants do not fit so lovely in the bum. then i found a four-piece pattern that is PERFECT. except it is sized for a 2 year old. so i put together the information gleaned from these patterns, my pre-existing knowledge of how pants are constructed, and a pair of pringle's pants to create my own pattern. perfectly sized for pringle.

second pattern. nifty, but needs work.

and now i am obsessed. O.B.S.E.S.S.E.D. seriously. i made him three pairs yesterday and i have plans for more. LOTS more. this kid will never again be sans pants, because i think he is beyond adorable when he wears them. and they did not cost me a dime. thank you neverending stash of fabric.

third pattern. presto perfecto!!

8.29.2011

little things that make my world go 'round.

yesterday the mister sent me a text message asking if i could go to the grocery store to pick up some things. "smooth peaches" were on the list. do what? exactly.


there are lots of peach trees in lesotho. they were first brought to the country in the early 1900s by french missionaries (so the story goes) and can now be found in every village. as a result, the basotho LOVE peaches. but there are no nectarines. i guess that is why the name "nectarine" has simply not stuck in the mister's brain. he discovered nectarines during one of his first visits to the grocery store and was immediately in love with the hairless peaches.  after living here for four years, he still calls them "smooth peaches." and every time he says it i giggle and adore him a little bit more. in my world it is not the big stuff that matters, but all the little things that add up to our life together. like calling nectarines smooth peaches.

 
the peach tree outside my hut in lesotho.

driving home from the grocery store with a bag of smooth peaches, i could not help but think of a song i first heard a couple years ago. i was at one of my best friend's weddings and her husband's cousin-in-law, dick siegel, performed his song "the little things." quite possibly the world's most perfect song. you should listen to it. it will make you smile.

Find more artists like Dick Siegel at Myspace Music

blanketed.

every day with a little baby brings new developments. the latest is that pringle is starting to grab hold of things that you put in his hand. this is rather exciting because it means we can give him things that he can use to keep himself entertained. and most things that we put in his hand eventually end up in his mouth.

trying to eat his sock monkey's arm.

he has a rattle that he plays with by shaking it and waving it around or he shoves it in his mouth and sucks on it. the problem with this rattle is that once he drops it he cannot pick it back up. apparently he has not yet figured out the joys of his opposable thumbs. being a mini-human means that he is also fascinated by ordinary things like burp cloths, which happen to be much easier for him to hold. after considering these basic facts, i decided the little guy needs a toy that is easy for him to hold, play with, and suck on. enter the lovey or security blanket. i have decided that pringle needs one. yes, NEEDS.

trying to eat his momma's sewing.

i could head over to target and pick up a security blanket for $7.99, but what kind of crafty mom would i be if i purchased something that i could lovingly make myself? and of course i could make this blanket by sewing together two pieces of cloth, but well...have you ever met me? no? oh, well in this house we like to complicate things as much as possible. so rather than take anything resembling an easy route, i instead used leftover fabric from THE quilt to make a mini quilt. and a mini stuffed owl. and then i sewed the two together and, if i may say so myself, the result is rather marvelous. it only took me a week.

ladies and gentlemen, meet paco...


me thinks pringle likes paco...
 

8.21.2011

minimalist amusement.


a week after the mister and i found out we were pregnant, i dragged him to the local baby store. my goal was not to show him all of the things i wanted for our baby, but rather to show him the vastness of the world of baby products, most of which i was hoping to avoid purchasing. i had rather strong opinions on what i wanted, but having never before had a baby i was not always sure what things were optional. i tried to find a list for guidance, but oh geez. i found gads of lists and they were all endless. yikes. in the end, we just went with our gut, buying the bare essentials with a plan to add as needed. we are not trying to deny pringle anything, we are just raising the kid on a budget. it turns out there is even a name for this... the minimalist baby.


this week the mister and i decided that pringle NEEDS a crib mobile. perhaps this seems like a strange necessity, but let us examine the facts. one, the kid is obsessed with the things that dangle from his play gym. and two, the kid wakes up at the crack of dawn and wants to play. clearly he needs in-crib entertainment....anything to buy us a couple extra minutes of z's. we pondered an ikea mobile, but it does not come with any way to attach to a crib. not sure why they call it a *crib* mobile, but that is a horse of a different color. long story short, it was not working for us, so the mister and i joined forces and made pringle a mobile.


the mister attached the arm of an adjustable lamp to the side of the crib and i sewed together some bits of cloth. we put it all together and now pringle has an adjustable crib mobile. he cannot take his eyes off of it. just in case he does, we also stuck a mirror on the wall so he can talk to himself. frugal-style fun and games.