7.24.2015

a funny thing happened on the way to summer.

once upon a time my little family of three was chugging merrily along through april looking forward to celebrating bubs' fourth birthday and eight glorious weeks of summer break. and then i got an email that flipped our world upside down. 


okay, a few background facts about our life:
a) we share a one bedroom apartment with a feral four year old
b) we like trees 
c) we need a change

back to that email. it was an invitation to interview for an art teacher position with an elementary school.
in colorado.

the end of an era.

for years, the mister and i have been dreaming of moving west but our focus has always been california. since that locale is completely out of our reach, we never pondered an actual move. enter keri, who should earn a commission for her relentless marketing of the glories of colorado. she planted the seed, even assisted in the job hunt, and suddenly moving across the country seemed like an option.

and then i landed that art teaching gig and the decision was made.

sayonara miami.

with that decision, our entire world was drop kicked into total chaos, since the timeline has been nothing short of nutty. the job offer arrived on may 29th and the bubs and i left for an already planned visit to california on june 9th. in between i finished the school year in miami, threw a 4th birthday party for the bubs, and packed up our entire house.

while i was in cali, the mister drove to colorado and found a house for us to rent, while i hired movers and rearranged travel plans. and then i left bubs in california with my parents. his first time being away from both of us. ouch. i headed to colorado for a week to join the mister working on the details of moving in and then off i went to miami for ten days to do all the moving out. alone. just me and the movers. 

the movers used 13 rolls of tape to wrap our furniture with blankies.

fingers crossed that the contents find their way to denver.

my mom's 1970s luggage wheels still going strong.

and now the mister and i are in colorado stuck in that special hell known only to those in the midst of long-distance moves -- all of your possessions are on a truck somewhere between your old city and your new one and you are living in a state of suspense in a mostly unfurnished house trying to subsist on frozen lasagna from costco. don't get me wrong, that lasagna is good stuff, but well, you know.

our new home.


meet pearl. my new ride.
needless to say, the last eight weeks have been overwhelming, but we are excited for this new beginning for our little family. bubs is still in california missing us like crazy, but soon he will be with us. we cannot wait to explore our new city with him and to see him frolicking in his very own backyard. this has been a big step for us, but we think it will be a good one.


missing my bubs.

7.29.2014

pattern weights tutorial.


i have been sewing up a storm this month, which means i have been all over pinterest looking for tutorials and patterns. of course, it is impossible to search for something on pinterest and avoid pinning completely unrelated projects. hence, i discovered the wonderful world of pattern weights. i have been grudgingly pinning my patterns to my fabric for as long as i have been sewing. sometimes i throw caution to the wind and cut without pinning, but this is ill-advised. suddenly, having a set of pattern weights seemed imperative. cue the pinterest search. there are a gazillion pictures of pattern weights, but 93% of them are washers or nuts wrapped in ribbon. totally not my cup of tea. then there are the pyramids. cute, but too bulky for my taste, which leaves us with the flat beanbags. yum. but maybe i am the only one who thinks so, because there is a dearth of inspiration in this department. there is a nice tutorial from positively splendid, but that is about it. i figure i should add my two cents.

materials:
  • fabric - i recommend a thicker fabric. you could either use a heavier weight fabric such as canvas or you can interface a regular fabric. the amount of fabric depends on how many weights you intend on making. this is a good time to use up scraps - no reason all of your weights have to be identical. 
  • filling - you need something that is small, but heavy. i ruled out the traditional rice and beans, because i was not keen on putting food with my fabric stash. i planned to buy BBs, but they were more money than i wanted to spend. looking for a free solution, i pondered beach sand, but i was concerned that it would squeeze out of the seams and make a mess. luckily, the mister remembered the miniature gravel at his school's kayak launching ramp. perfecto!


directions:

step one. decide on a shape and size for your pattern weights. i made my weights triangular, because i think they will work better if i am trying to cut out smaller pieces and/or need to put a weight near a corner that is less than ninety degrees. not to mention, triangles are awesome. my triangle pattern.

step two. decide how many pattern weights you want and cut two triangles for each weight. most folks seem to make sets of six or eight. i made nineteen. yep, nineteen. i wanted a lot, because sometimes you need to lay out all of your pattern pieces simultaneously and six weights will not cut it.

step three. put two triangles right sides together. sew around with a 1/4" seam allowance leaving a 1" gap at the bottom. snip the threads and clip the seam allowance around the corners. turn the triangle right side out through the little gap.


step four. use a boning tool or chopstick to push out the corners. then repeat step three for all of your triangles. 


step five. realize that the process of snipping threads and clipping corners is going to make a mess, so pause pattern weight production to create a cute thread catcher. feel free to use your prototype or unfinished pattern weights to hold down the pattern for the thread catcher. adorable fabric bucket tutorial.


step six. fill each of the triangles through the little gap at the bottom. leave some room to breathe in each of the triangles. i left about 1/4" empty along the bottom of each triangle. this leaves the weight malleable enough to pick up easily. pin the gap closed and add it to the stack of ready-to-be-finished weights.


step seven. the finish. all that is left is to close the gap at the bottom of your triangles. you can use your machine to top stitch along the bottom or even top stitch around the entire triangle. i top stitched the bottom of my prototype, but i did not like the appearance. instead, i went against every fiber of my being and opted for hand-sewing the gap with a blind stitch. this was an unusual step for me, because anytime a pattern requires hand-stitching, i always (and i mean ALWAYS) ignore it and machine stitch. but these little gems just look so perfect when they are hand-sewed, it was totally worth the trouble (nope, i did not take the requisite picture of myself hand sewing. you will have to use your imagination). if you do not know how to do this type of hand-sewing, check out this tutorial. it is easy.

top-stitched triangle. no, thank you.

step eight. find or create some sort of receptacle to hold your new darlings. enjoy your pattern weights!


9.16.2013

leggy. humph.

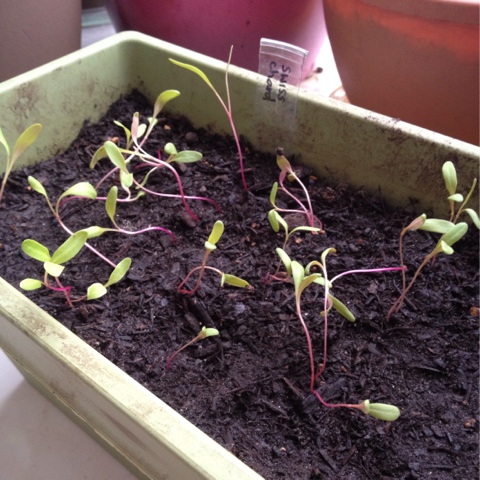
i have been noticing that despite sunshine, rain, and tender loving care, my swiss chard seedlings are floppy. today, i asked my gardening guru, doc, if she thought i had something to worry about. 

legs a mile long. sayonara floppsies. 

her diagnosis? yes. apparently my seedlings are leggy. do what? yes, they are leggy. this means they are growing up up up in a desperate attempt to get closer to the light. oh. and here i thought that they were getting taller taller taller, because of my magical gift of gardening. since i have a second not-yet-leggy pot of chard seedlings, we determined the best course of action for this pot, was to tear out the leggy seedlings and start anew. sad, but true. new seeds were started, pot was relocated, and this time around we are hoping for sturdy seedlings. grow chard grow!

9.08.2013

sprouts galore.

cucumber sprouts.

holy sproutville. okay, this gardening thing is happening. i planted the seeds, gave them water and sunshine, and shockingly, they grew. this might not be shocking to you, but it was to me. i was gung-ho about this project, but realistically, i was well aware that i am not known for my gardening skills and there was a significant chance that this project would be a total fail. but, the sprouts are growing like crazy. 

garden bean sprouts. these guys were slow starters, but now they are taller than everyone else.

when i dropped the seeds into the dirt, i was super generous. my methodology was something along the lines of, throw in a thousand and hope that one sprouts. well, one sprouted. and so did all of the others. so the pots were thick with sprouts.

kale sprouts gone wild.

my gardening gurus advised me that i needed to do some thinning. ummm...WHAT?!! i took some microscopic little dots of nothing and brought them to life and now you want me to lop them off and throw them away? gaaaah. but, both of my gurus have seriously awesome gardens, so i trust that they know what they are talking about.

a forest of kale.

today i bit the bullet and thinned my sprouts. it was depressing. i had to chop chop chop the darling little sprouts. sad. but the goal is for the ones that remain to grow like gangbusters. one can only hope. i also planted some more seeds. this time i tried to be a confident gardener and i only put a few extra seeds. they better do me a solid and sprout!

kale, post-thinning. looking kind of bleak, but i have high hopes.

9.02.2013

what does my garden grow?

our balcony used to be this lovely place where we could relax with a beverage to enjoy some fresh air and people watching, but then we had a kid and the balcony turned into a cluttered mess. the mister and i have been increasingly disgusted by the craziness and started discussing affordable ways to organize the chaos.


and then two weeks ago, i had a pre-mid-life crisis. this self-described non-gardener suddenly decided that i needed to have a vegetable garden. the notion is a bit ridiculous, because our balcony is only about forty square feet, but i figured our garden could grow vertical. i blame all of this on keri. she has a ridiculously prolific vegetable garden and regularly posts photos that made me green with envy. so green that i became delusional enough to think that maybe i have a green thumb. right.


i instantly started researching container vegetable gardens and found gads and gads of information. plus keri, and the doc, and mrs. nipper knapp jumped right in to provide guidance and encouragement. since i was completely unable to wait even seven minutes to get my hands dirty, i immediately hunted down a baker's rack on craigslist. found some pots on clearance. bought dirt and seeds. and got to planting three pots. miraculously,  a few days later, i woke up to find that some of the little guys had sprouted. it was an exciting moment. i can't stop hovering over my little sprouts...they make me super happy!


unfortunately, i also realized that the dirt in those first three pots was packed waaaaaaay too tight. tonight i scooped up the sprouts, dumped out the dirt, and repotted the sprouts. hopefully they will not be in shock. but, if they are, i will just start over with new seeds. i also finished planting the rest of the seeds and the tomato and pepper plants we bought. the garden is perfect. i cannot wait to teach big-E how to be my helper.


we are growing basil, chives, parsley, mint, cucumbers, green beans, tomatoes, red bell peppers, kale, swiss chard, lettuce, radishes, and beets. i am still looking for some more seeds to fill my remaining three pots, and then the garden will be full. next step, reorganizing the other side of the balcony. ugh.


p.s. any and all gardening advice is welcome. especially from those folks who have attempted to grow veggies in containers.

7.24.2013

wanted: poodle skirt. a dining table makeover.

in the sixth grade, i met blondie. i spent lots of time at her house and always marveled at the fact that no matter what, her family ate dinner at five o'clock. every day. for reals. so perfectly 1950's. so perfectly awesome. despite my mom's best efforts, our family drifted to the opposite extreme. occasionally we all ate dinner together, but more often then not, my mom had to catch us between our comings and goings to gymnastics, volleyball, hockey, etc. we ate at the kitchen table, kitchen counter, or sitting on the couch. at some point along the way, i decided that when i had a family, i was aiming for the 1950's version of dinner time. right.

my DIY assistant.

when the mister and i got married we had no table. we ate sitting on the couch or at the kitchen counter. but i wanted us to be able to gaze adoringly into each other's eyes over our plate of macaroni and cheese, so the day our ikea opened, we went and bought a little table and chairs. it was great for a few minutes, until our life swallowed it. and then big-E rolled in and that was the end of even thinking of dining at that table.

our starter dining set.

we ate all of our meals on the coffee table, sitting on the couch. we even bought the little guy his own chair, perfectly sized for him to join us at the coffee table. and when people came over, they joined us, on the couch. oy vey.

literally 1950's. no, thank you.

we have a lot of furniture. a lot. we had a full house of furniture and then a few years ago my grandmother passed away and we acquired more. the arrival of big-E exasperated the problem, but last week, as i was sewing at our "dining" table, i had an epiphany. get rid of all the little bits of unnecessary furniture cluttering up our two rooms and buy one big dining set. oh, and did i mention that we had no money for this? seriously, zero cents.

the mister painting the base coat under close supervision.

enter craigslist. i posted some of our excess furniture for sale and voila! moolah!! we even spontaneously sold our coffee table. exciting, although it was a rash move, because our living area is now devoid of all tables. oops. anyhow, we took our greenbacks and went shopping. we found an old queen anne-ish style dining set. probably built in the 1950's. $50. yes, please. SOLD.

transformation.

we bought it. dismantled it. recovered the seats. repaired it. and painted it. now, it is so delectable. and we can all eat together at a proper table. we can even invite friends! and we can teach big-E some proper table manners. happy mama. now i just need a poodle skirt.

swoon.
(ignore the lack of any other decor. we have a toddler.)

7.13.2013

embroidered quilt label tutorial.

i believe every quilt should have a label. why? because, by nature, quilts are family treasures that are passed down through the generations. one hundred years from now, the owner of your quilt will be wondering about its history. some folks think there are different ways to make a quilt label, but in my world, there is only one right way. hand embroidered.

when i made my first quilt, i searched the internet for some clues on how to make a quilt label, but i did not find any information on creating embroidered labels. hence, a few years later, here is my step-by-step guide to making a hand-embroidered quilt label. note: the pictures for this tutorial were taken when i was making a label for a newborn baby's good wishes quilt -  all names have been obscured to protect the innocent.

materials:
  • piece of fabric about 12"x12": you can use fabric from the quilt or a solid color. i like to use unbleached cotton muslin
  • piece of fusible interfacing that is 1/4" wider and longer than your desired label: if you are planning a 4"x4" label, you need a piece of interfacing that is 4.25"x4.25"
  • iron
  • label plan: see step 1.
  • disappearing ink pen - you can use the washable ink, fine point markers available in sewing stores, or you can use the pilot frixion erasable gel pen (fair warning-this one is not made for fabric, but i love it)
  • hand-sewing needle
  • embroidery floss/thread
  • embroidery hoop
  • scissors
  • a little piece of cardboard (i used the cardboard from a cheerios box)


step 1. plan your label. on paper. you can hand write it, but i am a perfectionist, so i create my plan on the computer and print it out. if you choose this method, be sure to use a simple, easy-to-read, sans serif font. i like to use handwriting fonts. if you want to add any designs, like chickens with ears, you should include them on your label plan. borders are optional. you can include any information you want, but at the very least, you should put your name and the date you made the quilt. you can also give your quilt a name, or if it is a gift, you can include the name of the recipient and the occasion. the sample below is my standard format for newborn baby quilts.

step 1. iron the fusible interfacing onto the back of the fabric. it should be in the center of the fabric.


step 2. tape your label plan on your light table. my light table is my sliding glass door. fancy, eh? please ignore the mess that is outside.


step 3. tape your fabric over the label plan, interfacing side down. make sure your label is centered directly under the interfacing.


step 4. use your disappearing ink pen to carefully trace all letters and designs. if you have straight lines to trace, use a ruler. seriously. you can thank me later.

trace the letters and designs.

use a ruler to trace any straight lines.

step 5. put your fabric into an embroidery hoop. make sure the fabric is tight.


step 6. cut a length of embroidery thread. you want to cut it long enough that you do not have to constantly take new thread, but not so long that it is constantly tripping all over itself. i typically cut about 36". now that you have your chunk of thread, check it out. notice it has 6 strands? great. separate it so you have three sets of 2 strands. find your little chunk of cardboard and cut a little (1/4") slit on each side. wrap two of the 2-strand chunks around the cardboard, securing the ends in the little slits. pick a needle with which you want to sew (make sure the eye is large enough to fit your thread, but not much larger) and thread it with the third strand.

6 strands.

2 strands.

1 chunk on the needle and 2 chunks waiting on the cardboard.

step 7. use a basic back stitch (instructions here) to carefully stitch the letters, designs, and border. use as few stitches as necessary to make each letter. now, i am not saying to be frugal, but also, do not use thirty-seven stitches to make one letter. if your fabric starts to get slack, stretch it over the hoop again. when you stretch the fabric over the hoop, it could make your straight lines look wonky. make sure your stitches follow the line, no matter how wonky. trust me. when you take it out of the hoop, the fabric will no longer be stretched and everything will once again look straight.

the requisite mid-sew picture.

wiggly lines, because the fabric is stretched in the hoop.

finished!

step 8. trim the fabric, leaving about 1/2" around the label. fold the edges to the back and iron. (my apologies, i forgot to take a picture of that step.) finally, sew the label onto the quilt. i attach the label to the back of my quilt, after my quilt is completed. you can also attach it before you make your quilt sandwich; however, if you do this, keep in mind that your quilting stitches will go across the label. i like to use my machine to top stitch around the the edge of the label. yes, the stitches show through on the other side of the quilt. if you do not want the stitches to show through, then you either need to attach the label before making the quilt sandwich, or you can hand stitch it onto the back of the quilt making sure your stitches only go through the first layer of the quilt. congratulations, you have a beautiful handmade quilt label!

the label attached to the back of the quilt. notice all the lines that were wiggly in the hoop are now straight.

the quilt folded up and tied with a ribbon. i like to fold it, so that i can fold back the edge to display the label.