Showing posts with label scraps. Show all posts

2.12.2013

when all else fails...plan.

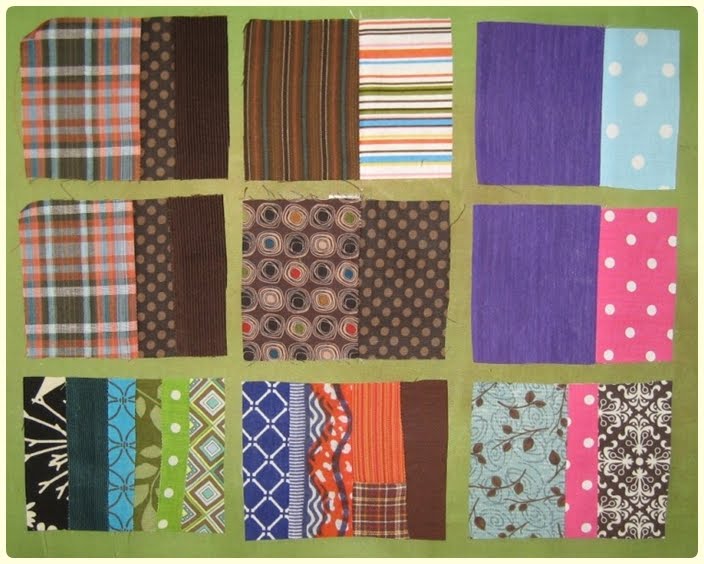
20 piles of color planning.
i missed the president's state of the union address. oops. total fail. i could watch a recording of the speech, but i think i will opt for getting the NPR recap and reading the relevant new york times articles. my apologies mr. president. it is not that i do not care, it is just that i can barely find time to feed myself, so there is little chance of me having 1.5 hours to listen to and/or watch your speech.


planning the quilt blocks.

yippee.

the good news is that in the midst of completely and totally forgetting to change the channel to the state of the union, i was busy working on my quilt. making progress people, making progress.

skippee.

this past weekend i dug through all of my scrap and fabric boxes and pulled out bits of every lovely fabric i own. each chunk was meticulously starched, ironed, and then sliced and diced into 2.5" squares. about three hundred squares. yes, you read that correctly. thank goodness for rotary cutters. seriously, i cannot comprehend how people created multiple quilts without these heavenly slicers. just thinking about it is enough to send my brain into a tailspin.

dandy.

eye candy.

anyhow, after hours of sorting, ironing, and cutting, i had to do some color planning. the result is twenty quilt blocks arranged and readied for sewing. i sewed one just to see how the blocks will look. scrumptious, eh?

the first finished quilt block.

now i just have to sew 19 more. good golly, miss molly. and just in case the quilt was not enough, i also had to make a birthday present for one of big-E's buddies. i made what i have dubbed a super blankie. suitable for sleeping, picnicking, superhero capes, etcetera, etcetera, etcetera.

super blankie.

2.06.2013

scrap me silly.

oh my, where does the time go? the looooong pauses between posts are unintentional, but it seems that they are here to stay. luckily for all of us, keri is determined that this is not the year our blogs will die, so here we are. so happy together.

this little fella sucks up all of my time.

the days are all running together, so it seems like just yesterday that mrs. nipper knapp and i decided that we should make quilts for ourselves. just for fun. just because we are awesome. just because. yup, that is it. we have no other reason. but considering that my scrap box is now three boxes, yes three, it seemed like a good idea. of course i do not undertake projects like this without a plan, so i started pondering what pattern i would use. i wandered through internet land. lots of scrap quilts. and then i jumped onto pinterest. whoa nelly, loads of scrappy quilts. and now i am completely overwhelmed. while i have dithered back and forth between patterns, the missus n.p. has been sewing and sewing and sewing. and trying her hardest to get me motivated to jump in while the quilting is warm.

the problem, of course, is that i have about as much time for sewing as i do for everything else. ummm, none. oh and my sewing machine lives in the bedroom. where big-E sleeps. but, i dragged my machine into the living room and mrs. n.p. gave me another kick in the pants and now i am seriously determined to start before the end of this week. so i picked a pattern. i think. oh my god, there are sooo many. and they are so lovely. and i want to make them all. but i think i have made my decision. final answer? yes. i think. 

granny squares from blue elephant stitches.

i am ridiculously enamored of quilts that have bits of color in a sea of white. this pattern definitely fits that bill. but then i started thinking that it is not going to relieve me of my humongous stack of scraps. plus, i am still struggling to settle on just one pattern. sooooo... i am going to make a double-sided quilt. i mean, why not? it is a quilt for me. so i can do whatever i want. might as well make it so complicated that i can work on it until big-E is twenty-three. wheeeeeeeee!!

string quilt by leesa. oooh la la.

the back (or is it the front) will be a string quilt, which is sort of a patternless pattern. delectable. so with no further ado, here goes nothing. uhh, i mean, here goes the quilting.

11.14.2012

scraptastic.


i think it is safe to say that i am fanatical about organization. and i adore efficiency. when it comes to organization and efficiency, my art classroom is a work of art. it is also a work in progress. since day one, the scrap paper boxes have been one of the most vexing corners of my room. i try to save as much paper as possible, for use in future projects, but storing it is a constant struggle.

before. blech.

a lot of projects require semi-specific sizes of paper, so i thought it would be perfect to categorize the scraps by size. but then reality hit. do i put the smallish large scrap in the medium or large bin? what about the large small piece? oy yoy yoy.

glum. glum. glum.

and then i saw this.

ms. naples' scrap boxes. (picture from orange beautiful blog.)

oh my mama llama. after i picked myself up off the floor i got straight to work sorting. and sorting. and sorting. i scrounged up some extra boxes, made a label for each color, and dropped the paper into the new boxes. and then i fainted. 

gloriousness.

victory.

the corner still seemed a bit blah, so i figured i should follow the lead of my inspiration, ms. naples, and make a sign. i am not usually one to toot my own horn, but seriously people, this sign? it is awesomeness. for reals.


love. bring on the scraps.

can i get a hallelujah?

1.08.2011

wonky stripes quilt pattern.

hello quilters. if you are interested in a quilt that does not require gads of painstaking measuring, cutting, and piecing, this is the quilt for you. this design works well with both planned fabrics and scraps.


how much fabric should you buy? great question, but it depends on how big you want to make your quilt. at the end, i will show you how to calculate your fabric needs if you want to do a different sized quilt. the materials list is for a quilt that has 7.5" squares and a final size about 60" x 60".

materials:
  • 1/3 yard of each of 9 fabrics for the quilt design
  • 2 yards of fabric for the quilt top border
  • 3 2/3 yards of fabric for the back
  • 1/3 yard of binding fabric
  • 64" x 64" square of batting
  • 1 spool of quilting thread

quilt top:
take each of your 9 fabrics and cut along the long side of each to make 5 or 6 wonky strips (i.e. smaller at one end). to ensure that your strips are appropriately wonky, i recommend using scissors instead of a rotary cutter. you can also do wavy lines, but these are more complex to sew. see my tutorial on sewing wavy lines.

cut wonky strips.

mix up all of the long strips. create strip sets with different fabrics. sew strips together with a 1/4" seam allowance.  make sure the strip set is at least 8" wide. press the seams open, using starch as you iron. starch is your friend!!! it not only helps to create flat seams, it also acts as sizing, so that the fabric will hold its shape when you start cutting.

mix together fabrics and sew together strip sets.

cut each strip set into five 8" squares. you should end up with 45 squares. using the clear plastic quilting rulers and a rotary cutter is the easiest way to complete this task. if you do not possess these items, then find yourself some joann's coupons and go shopping. seriously. it is possible to cut these squares without these tools, but why on earth would you want to make your life extra difficult?

cut out squares. finished square.

set aside 9 squares for the quilt back. lay 36 of the squares on a large, flat surface (i use the floor), and move them around until you are satisfied with the arrangement. for this design you should use a checkerboard-style pattern with vertical-lined squares next to horizontal-lined squares (see picture - orange squares represent vertical-lined and green squares represent horizontal-lined). sew the squares together with a 1/4" seam allowance. press the seams open. again, be generous with the starch.

arranging vertical and horizontal stripes in a checkerboard pattern.
arranging the squares of a large quilt that was made with this pattern.

lay out your border fabric. you will need to cut four 7" strips the length of the fabric (i.e. 7" x 72" strips). attach your borders either with mitered corners or butted edges...your choice. trim any excess fabric.

now for the quilt back. sew together the remaining 9 pattern squares. press the seams open (don't forget the starch!). lay out your backing fabric. cut out two pieces. 16" x 64" and 40" x 64". sew the strip of squares to the long edge of one piece of backing fabric. then attach the other piece of backing fabric to the other side of the strip of squares. press the seams open.

cutting the backing pieces.
the assembled quilt back.

since this post is focused on the quilt pattern, not on teaching you how to make a quilt, i have included links to helpful tutorials for the final steps of quilt creation.
  1. make your quilt sandwich.
  2. quilt your quilt. unless you are a die-hard traditionalist, i assume you will be using a machine to do the quilting. you can do free-motion quilting (more free-motion quilting) or straight-line quilting (which also includes stitch-in-the-ditch quilting). trim the excess fabric from the edges.
  3. attach binding (more binding and more binding).
  4. create a quilt label (i do hand-embroidered labels, but that is a tutorial for another day). and sew it onto the back of the quilt.

voila!! you have a lovely wonky stripes quilt.
a larger version of the same quilt pattern.


calculating fabric for alternate quilt sizes.
the measurements in this example are the ones i used to calculate how much fabric was needed for the 60" x 60" square quilt.

quilt top design:
most fabric is 42-44" wide, but that includes selvages, so we will assume you have a usable section at least 41" wide. we want an 8" square, which means that we need 8" + seam allowances. since we will be cutting our fabric into strips, we should add in a few inches for seam allowances. to be safe, i would purchase 12" of fabric (1/3 of a yard), which will yield 5 squares. each additional 12" piece of fabric will result in another 5 squares. our quilt calls for 44 squares, so we will need 9 different fabrics (9 fabrics x 5 squares per fabric = 45 squares, which is 1 more than we need).

determining fabric requirements for quilt top pattern.

quilt top border:
this design includes a 6" border. the quilt top is to be 60" wide, so you need to buy at least 64" of fabric (this includes extra for seam allowances). buy 2 yards of border fabric.

quilt back:
this design uses 8 squares from the quilt top sewn together to form a strip down one side of the back. the rest of the backing fabric can be whatever your heart desires, just remember that the quilt back needs to be a couple of inches larger on all sides. for this size quilt, you will need 128" (3 2/3 yards) of fabric. you will have excess, but there is no way to avoid this (unless you want to piece together your backing, in which case you can create your 64" square any way that works for you).

quilt innards:
you need quilt batting that is at least a 64" square. you can buy whatever batting you prefer - personally i prefer low loft cotton batting. my standard is warm & natural, but when it is available my favorite is a 50% cotton, 50% bamboo batting.

quilt binding: 
you will need to cut 2.5" strips and sew them together until you have enough binding to go around all four sides of the quilt. the binding will be 60" x 4 = 120", plus a little extra, so you need at least 130" of binding. your strips will be 41" long (the width of your fabric), so you just need to know how many to sew together to get the desired length. 4 strips will be about 164" long. perfect. 4 strips x 2.5" wide = 10" of fabric. to be safe, you should buy at least 12" of binding fabric.
determining fabric requirements for quilt binding.

6.27.2010

luggage tag tutorial.

as you might remember, back in december i was trying to figure out how to label my luggage when i had a breakthrough...fabric luggage tags. the mister and i are in need of more luggage tags, so today i got busy sewing. i decided to document the process and create a tutorial for those of you who like to sew. if you are not into sewing, fear not...i also sell these luggage tags in my etsy shop lerato designs.

materials: scraps of colorful fabric, light-colored fabric (i use unbleached cotton), interfacing, thread, and string (i use cotton twine).

sew together lots of bits or keep it simple with just one or two fabrics.

step 1. cut out a 3.5"x4.5" piece from your light-colored fabric (we'll call this the white piece from now on). cut out a 3"x4" piece of interfacing. sew together a collection of scraps and cut a 3.5"x4.5" piece from the assembled pieces (for an easier luggage tag, you can skip the assemblage and cut a 3.5"x4.5" piece from a single colorful fabric).

step 2. iron your interfacing onto the back of the assembled piece.
step 3. place the colorful piece with the white piece, right sides together.
step 4. sew around the edges with a 1/4" seam, leaving a 2" gap on one side.
step 5. trim the corners, to make it easier to the turn the tag right-side out.
step 6. turn the tag right-side out through the gap. use a bone creaser, chopstick, or some other pointy tool to push the corners all the way out. tuck the open edges in, pin, and press flat.
step 7. top-stitch around the edge of the tag (no more than 1/8" from the edge).
step 8. sew a tiny buttonhole on one end of the tag. open the buttonhole with your seam ripper or scissors.
step 9. cut a 13" piece of string. thread the string through the buttonhole and tie it off.
step 10. use a fine point permanent marker to write your contact information on the light side of your tag. enjoy traveling in style!!!

5.01.2010

the quilting saga.

i am not exactly sure what originally caused my quilt obsession, but some time in my childhood i came up with the notion that i wanted to make a quilt and that idea never left me. i started many a quilt during the years, but at some point in the process i always stopped. it was not until i joined the peace corps that i actually managed to piece together enough little bits of fabric to get past the inevitable hump that tries to block you from finishing a quilt. i have always been fascinated by crazy quilts. "crazy" meaning that instead of a structured repeating design, every square is a mish-mash of fabric. sounds simple. no problem. i thought "crazy" was just the design. oh no. crazy is how you feel when you are putting one of these together. every single little piece of fabric is stitched onto a backing fabric and then every edge of these itty-bitty pieces is embroidered, so it will not unravel. and that is just making the squares. right.

anyhow, my stint in the peace corps exposed me to lots of gorgeous fabric. i sewed and sewed and resewed. and i saved every single scrap, no matter how small. being enamored with quilts, i of course was once again planning a quilt. i started the quilt in 2004, sewing by hand in my little hut. then in 2005 i moved to a "modern" house with electricity for a few months and used an electric sewing machine. wahoo! after relentless periods of sewing like mad, i returned from africa with one hundred pieced together squares. although these still needed a LOT of work, somehow that hurdle of creating 100 squares was enough motivation to get me through the entire quilting process. and it was a HUGE process. holy bananas.  after i moved back to the states, i settled in seattle, where i diligently embroidered edges with a hand-me-down sewing machine. the sewing machine did not fit in my little car when i moved across the country, so i bought a new machine in 2006 and continued the mammoth task of embroidering edges. 2007 was the year of cutting all the squares to size and piecing them together. finally in 2008 i put together all the layers, quilted them together, and finished off the quilt. 4 homes, 3 sewing machines, 2 continents, 1 quilt. the finished product is large enough to comfortably cover a queen-size mattress. 

 the african crazy quilt.

so, having cut my quilting teeth on such a massive project, i have since found smaller quilts to be a "simple" process. okay fine, they are not exactly simple, but they are sure a whole bunch easier than monster-sized bedspreads. plus i now know what i am doing, which helps.

wowsa, wowsa, wedding quilts.

after the peace corps quilt, i came up with the brilliant plan to create a quilt for each of my best friends' wedding gifts. three quilts. fantastic. and then they all got married within 12 months of each other. gasp. let us just say that i did a whole bunch of quilting in a short amount of time. naturally when my brother informed me that he was going to be a daddy, my brain went into instant hyper-drive planning the perfect baby quilt.

the baby quilt bonanza.

and then i opened an etsy shop and realized that maybe, just maybe, i could convince people to BUY my quilts. this added a whole new dimension to my quilting, because i discovered that perhaps i could feed my quilting habit without sending the mister and i into financial ruin. fancy. i have not actually yet sold one to someone outside of my family, but i am hopeful. the only thing i did not calculate was how much this quilting obsession would take over my life. let us just say that i am putting together fabric combinations in my sleep. two years ago i had never before finished a quilt and now i have completed seven and have more in production. egads!!!

3.07.2010

just a softie.

since they might be the greatest method for using scraps, little creatures keep popping up. hello mr. hedgehog!! is that a wocket in your pocket?
little bits of happiness for everyone! thank you mollychicken.

3.04.2010

chicken love.

waste not, want not. when it comes to fabric, no scrap is too small to find its way into a project, so i never throw out cloth. thanks to my handy dandy storage boxes i have a place to keep all of my bits no matter how bitty they might be. i even have a box that holds what most would would consider to be garbage, namely bits of thread and fabric that are smaller than a pea. in general i do not consider myself to be a hoarder, but i figure that using every last fragment of fabric is environmentally friendly. speaking of saving the world...i am even incorporating reduce, reuse, recycle into my world of sewing. the mister does not yet know it (although plastering it on the internet is a surefire way for him to find out), but one of his holey undershirts was dismantled. the large chunks went into the closet as dust rags and everything else was tossed into storage box #12 to be REcycled into a shmancy sewing project.

hmm...what to do with the armholes of an undershirt? cut into teeny chunks and voila...stuffing. 
stuffing for what? a chicken. naturally. i found this blog mollychickens that has a header image of ten positively adorable chickens. although she doesn't include a tutorial for the chickens, i used her love bird tutorial to make a love chicken. cute, eh? pumpky, this one's for you!!